Installing Wazuh With Security Onion
As detailed in my previous post, Security Onion provides a very capable network monitoring solution. It’s capability can be enhanced by installing Wazuh with the Security Onion. Wazuh is a Host intrusion detection and prevention system. It can be installed as a very capable stand-alone product or in this case integrated with Security Onion. The Wazuh version that is currently integrated with Security Onion is 3.13.1. Due to this integration, the procedures for configuring Wazuh and its capabilities are slightly different then what would be expected with a stand-alone installation. This post will provide detailed instructions with screenshots of how to install and configure a Wazuh Agent as well as Microsoft Sysmon in conjunction with the Security Onion. This will provide excellent host intrusion detection capabilities as well as basic host intrusion prevention capabilities. I will be using the SwiftonSecurity Default Sysmon Configuration template.
Resources
Wazuh Agent Installation Instructions
1. Prepare the Environment
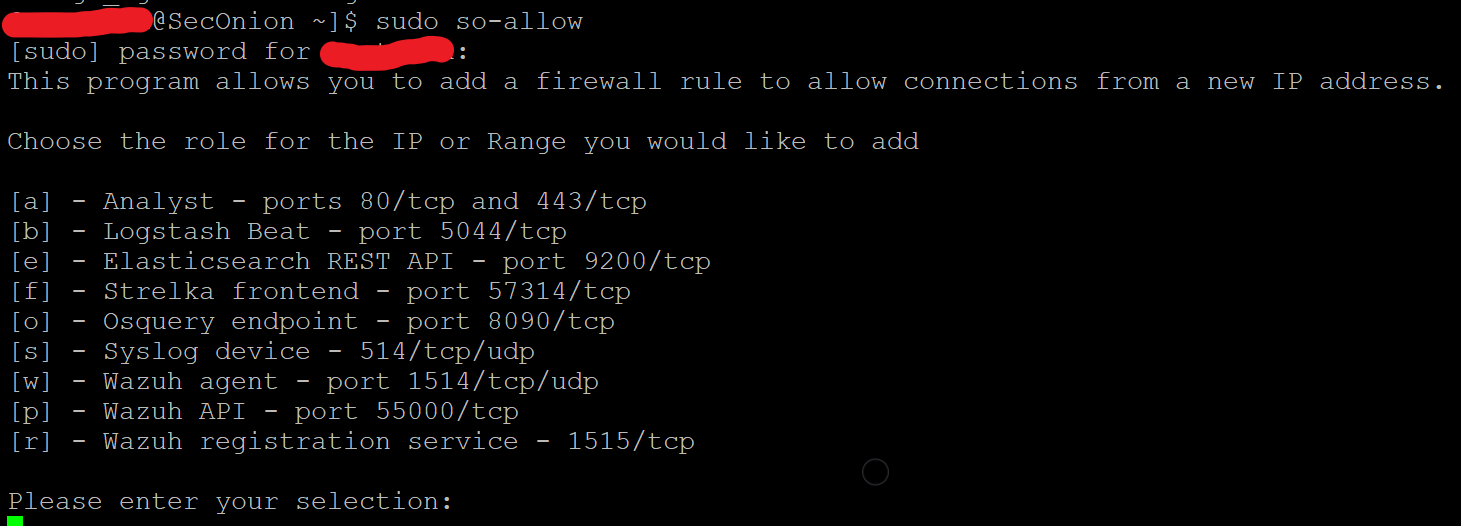
Security Onion includes a firewall that locks down all traffic by default. Prior to installing the Wazuh agent, We need to run so-allow to enable agent traffic from the host we intend to install the agent on to reach the Wazuh Manager. You will need to allow Wazuh registration service port 1515/tcp and Wazuh agent port 1514/tcp. Run this command from the Security Onion command line.
2. Register an Agent with the Wazuh Manager
sudo so-wazuh-agent-manage. You will need to know the IP address from your intended host. This command is run from the Security Onion command line. Don’t exit the agent-manage menu as we will do other actions next. 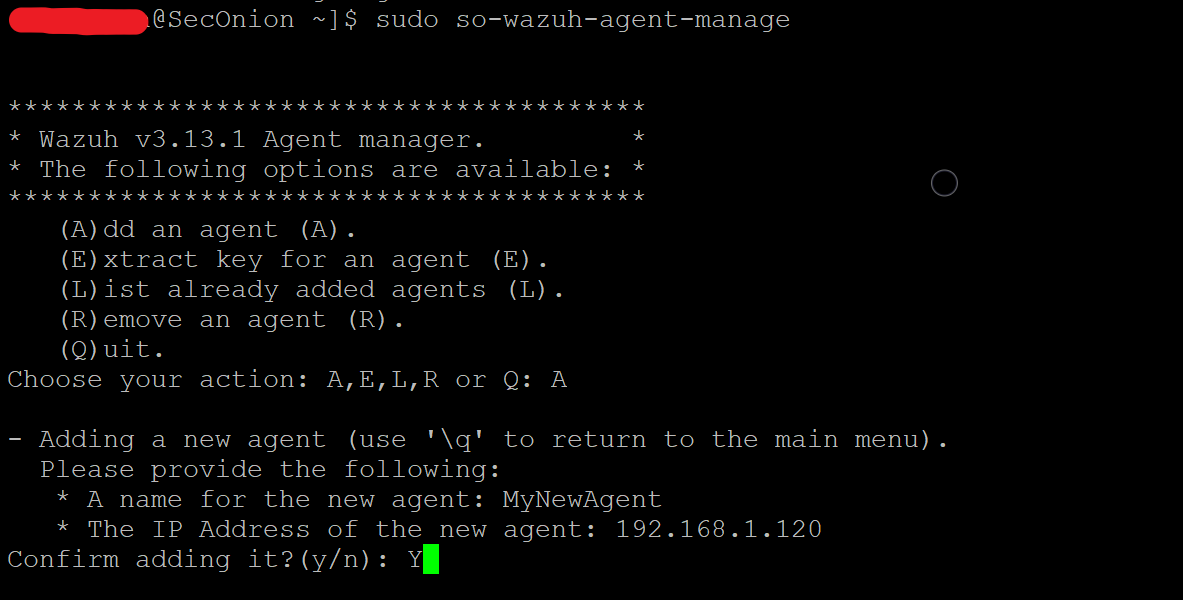
3. Extract Agent Key from Manager
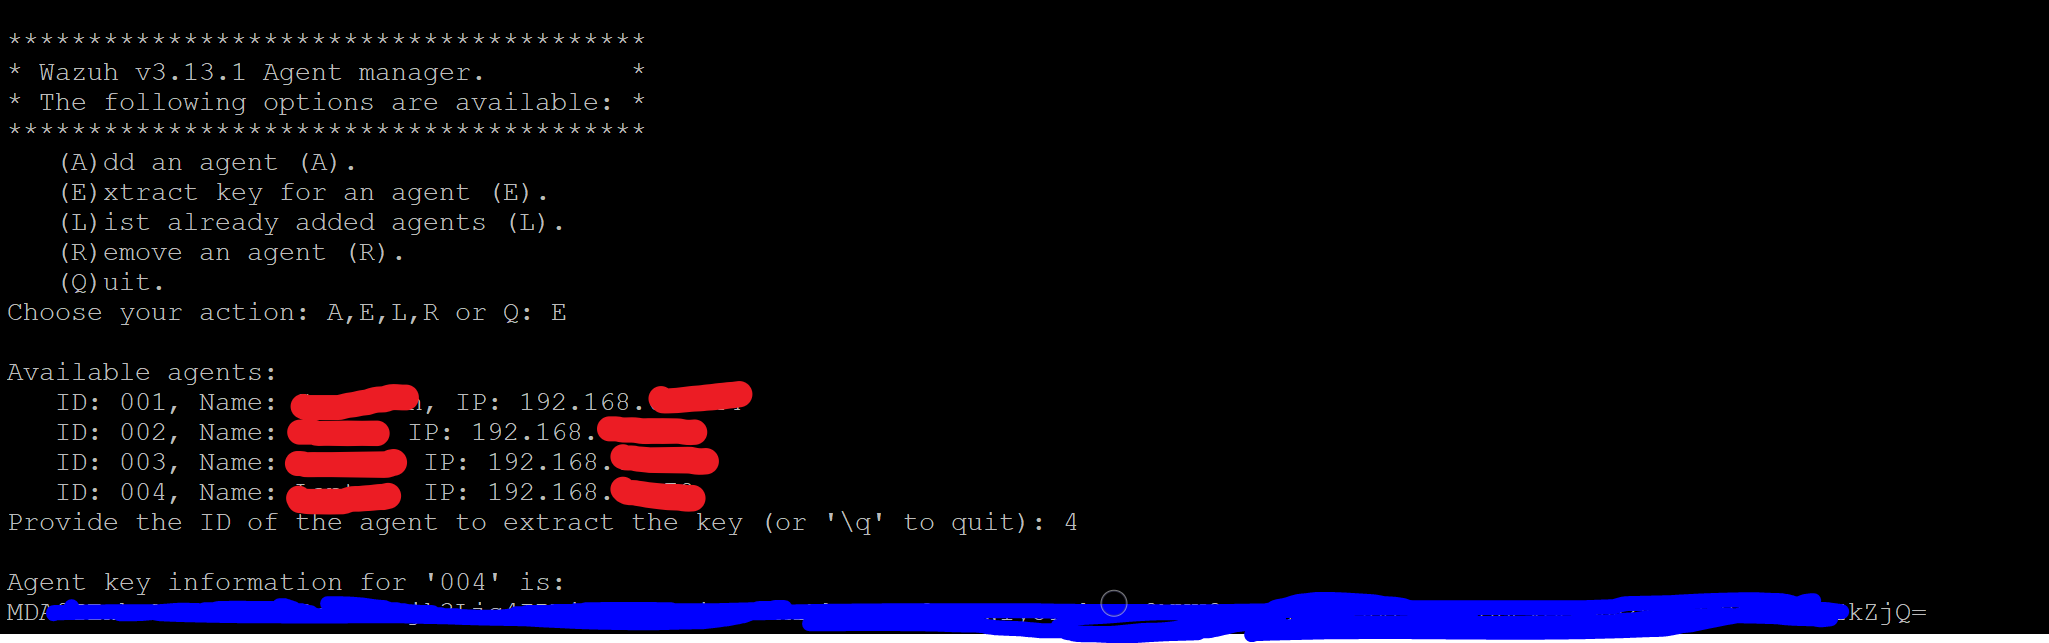
While we are in the so-wazuh-agent-manage menu we extract the key for the agent we just added. We will need this later to input into the agent configuration on the host. Select “E” and then enter the ID of the agent you just added. Once the key is outputted on the terminal, highlight and copy it. Paste that key into a note document for later use.
4. Download the Agent MSI from the SOC console.
Security Onion packages the Wazuh Agent and provides it for download from the SOC menu. To access this menu, you will need to use so-allow to allow your target host access to the SOC page via the browser. Alternatively, you can download the MSI via the analyst machine you gave firewall access to in initial Security Onion setup. Then, you can transfer the agent msi file to the intended host via other means such as USB, email, or network share.

5. Run the Wazuh Agent MSI
Once you’ve transfered the MSI to your target machine, run it by right clicking it and selecting “run as administrator.” The Wazuh Installation Wizard will then run. Ensure that you select the option to run the configuration utility after installation. In the Agent-Manage configuration utility GUI you will enter the Security Onion IP address AND the key you extracted and copied into the note document earlier. The “manage” drop down menu contains the options “start, stop, restart and status” After you’ve entered the Security Onion IP and the agent key, select “start” from the “manage” drop down menu. If you’d ever need to return to the agent-manager utility you can open it by running C:\Program files (x86)\ossec-agent\win32ui.exe

Sysmon Installation and Wazuh Integration
Ok, your Wazuh agent is installed and should be in communication with the manager. It is now gathering, shipping, and analyzing standard Windows Event logs. Its also performing file integrity monitoring, Compliance/vulnerability scanning, intrusion detection, and basic intrusion prevention actions. If we go one step further and install Sysmon and configure Wazuh to gather and analyze Sysmon logs, we will be greatly increasing our log analysis capabilities.
1.Download Sysmon and SwiftonSecurity Sysmon Template
- Download and extract Sysmon from Microsoft.
- Download sysmonconfig-export.xml from the SwiftonSecurity Github
- Place both the sysmonconfig-export.xml and the sysmon.exe in the same folder.

Install Sysmon Via CMD line
- Open up a CMD prompt with Administrator privileges. (search for “cmd” in taskbar then right click and select “run as administrator”)
- Navigate to the folder where Sysmon.exe and the template is.
- Run this command
sysmon.exe -accepteula -i sysmonconfig-export.xml
Add Sysmon to Wazuh configuration file
- Open File Explorer and navigate to C:\Program Files (x86)\ossec-agent\
- Find the file “ossec.conf”
- Right-click and select copy.
- Go to Desktop and select Paste.
- Open up the file and add the following:
- <localfile>
<location>Microsoft-Windows-Sysmon/Operational</location>
<log_format>eventchannel</log_format>
</localfile> - Save the file and close.
- Right click the file and select “copy”
- Navigate back to C:\Program Files (x86)\ossec-agent
- Right click and paste the new ossec.conf file. UAC will pop up. Elevate as necessary.

Restart Wazuh Agent
- While in the ossec-agent folder, select win32ui.exe and double click to run it.
- Select “restart” from the “manage” drop down menu.
- Wazuh will now gather and analyze Sysmon logs.
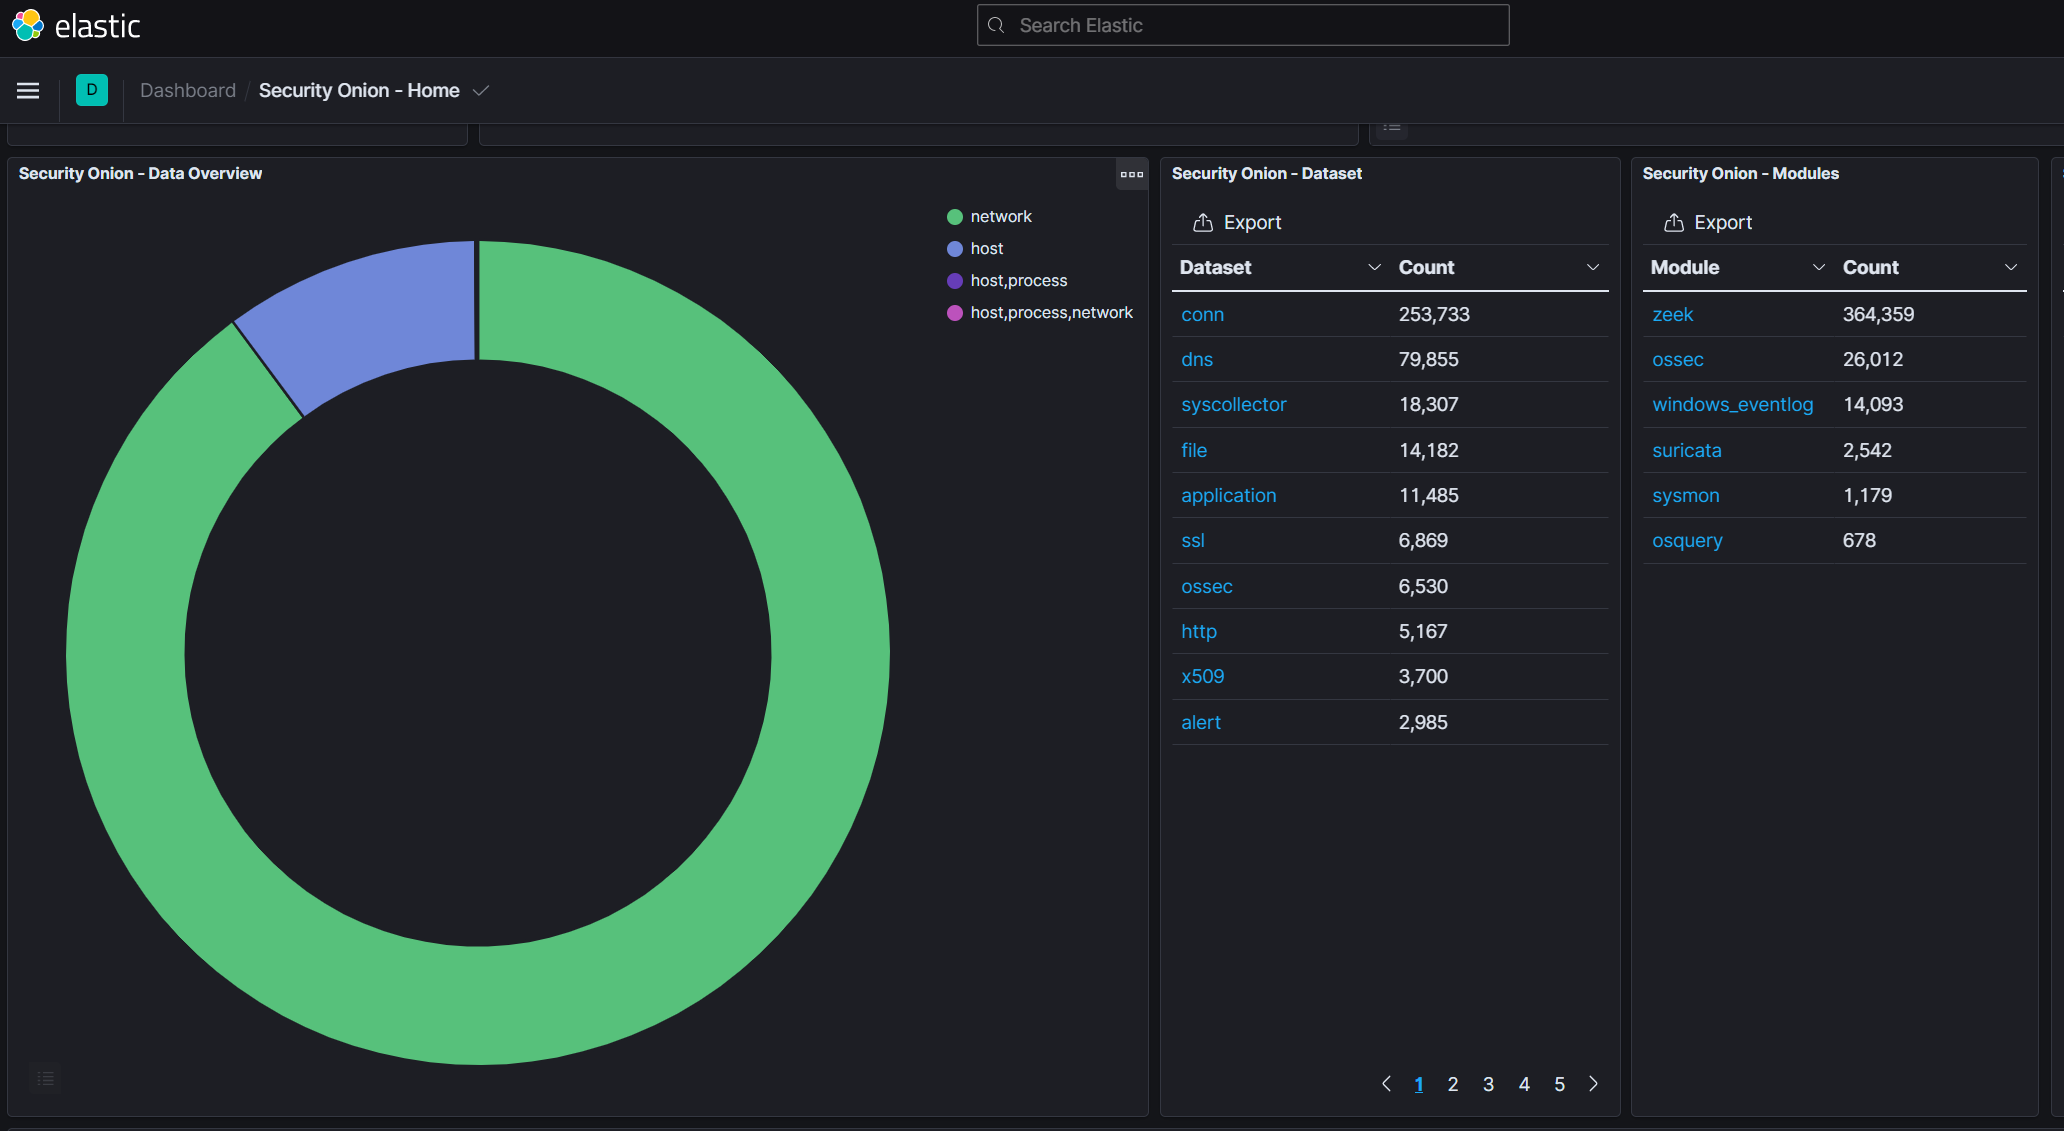
- Open up Security Onion SOC Alert page and/or Kibana to view the new entries. They will show as “Sysmon”, “Ossec”, or “windows_eventlog”