Installing Security Onion with Hyper-V

The developers of Security Onion bill it as a platform for “threat hunting, enterprise security monitoring, and log management.” Ok. Why would we install it on our home or lab network?
- It allows us to collect logs from many different home endpoints and monitor all ingress/egress traffic for our local network.
- If running a business or hosting internet available services from home, this could allow you to detect an intrusion and remediate the incident.
- It gives insight into what the devices on your home network are doing. You can learn things like peak bandwidth, what connections are seen the most, what devices are insecure etc.
- Learning Cybersecurity – Sometimes the “books” aren’t enough. This platform gives you hands on experience analyzing alerts and investigating possible incidents.
Requirements
- To allow LAN management access and mirrored traffic to reach the Security Onion you will need two Network Interface Cards(NIC) on your server.
- Suggested Hardware requirements for a 1gb home network are the following: 4 core processor, 16gb+ of ram, and at least 500gb of hard drive space. 1tb is preferred. 1Tb will allow approximately 3 weeks of packet capture to be stored. Security Onion is a ram hog. 16gb is what is required for the virtual machine only. Ensure you have enough for your other virtual machines/host.
- Microsoft Windows 10 Pro with Hyper-V enabled. – Its possible to install Security onion on bare metal or any other hypervisor. For the purpose of this installation using Microsoft Hyper-V , Windows 10 Pro would be required.
- A managed switch that is mirroring traffic from the port connected to the router to a port which will eventually be connected to the Security Onion Mirror NIC. This guide will not cover port mirroring. It is highly manufacturer dependent. You may search for “port mirroring” or “Span Port,” with your specific brand of switch.
- Latest Security Onion ISO. It can be found here. https://github.com/Security-Onion-Solutions/securityonion/blob/master/VERIFY_ISO.md
- The Official Security Onion configuration guide. https://docs.securityonion.net/en/2.3/getting-started.html
Create Your Virtual Machine
- Launch Hyper-V and select Virtual switch manager. Create a new external switch and bind it to your primary LAN interface.(not the mirror NIC)
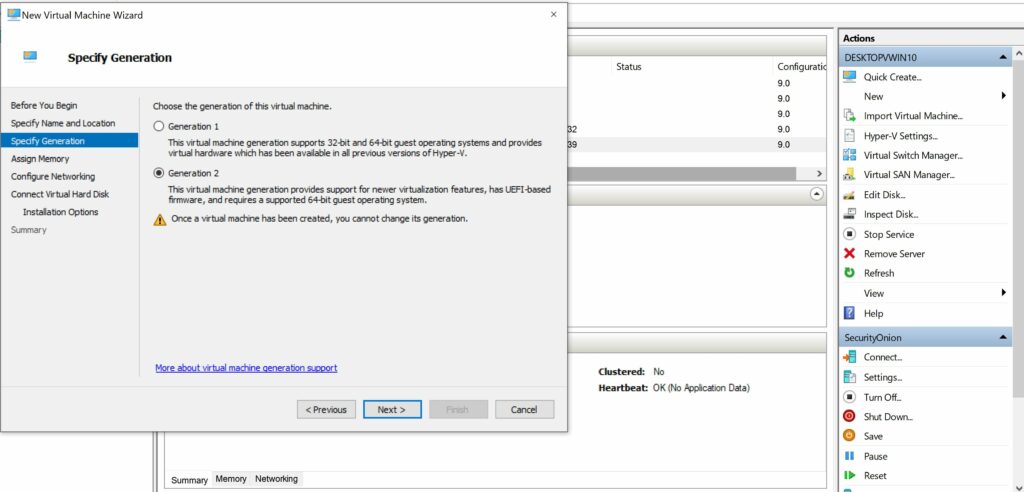
- Then select “new” from the menu on the right. Select Virtual machine.
- Ensure you select Generation 2.
- Assign 16gb of ram.
- Under the “Configure Networking” menu, select the switch that matches your LAN NIC manufacturer. Its probably “Intel Virtual Switch.”
- In the “Installation Options” menu select “Install an operating system from a bootable image file.”
- Select the Security Onion ISO image you downloaded earlier.
- Select “Finish”

Powershell!
- We need to create a virtual switch/NIC to accept the mirrored traffic.
- These commands assume you have VLAN’s present on your land. For the purpose of this writeup, I will configure this virtual switch for VLAN traffic for VLAN’s 1-3. VLAN 1 represents untagged traffic.
- Ensure you substitute your the name you gave your virtual machine for the place holder in the command. You may name the switch anything you like. I will use MonSwitch.
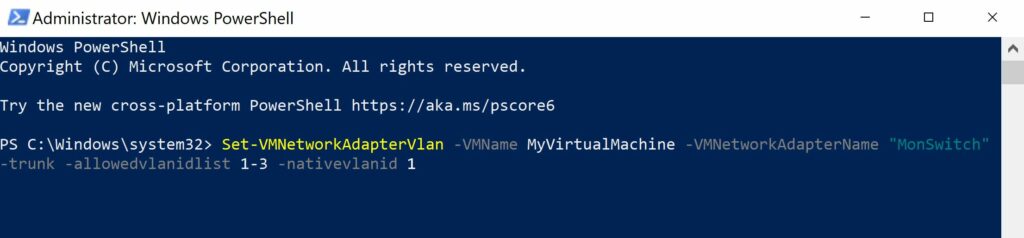
- Start by Opening a Powershell terminal with Admin permissions. Type “Powershell” in the Windows search bar. Right click the Powershell icon and select “run as administrator.”
- Enter the commands I’ve show below, substituting your information as necessary. I.e Virtual machine name, desired switch name, vlan’s present etc.
- Note- If you have multiple mirroring ports on your LAN and multiple NIC’s you’d like to create a virtual NIC for, you may enter command 1 more then once with a different switch name each time.
- Add-VMNetworkAdapter -Vmname -name “MonSwitch”

- Set-VMNetworkAdapterVlan -VMName <VirtualMachineName> -VMNetworkAdapterName “MonSwitch” -trunk -allowedvlanidlist 1-3 -nativevlanid 1
Security Onion Setup
- Breath
- The tricky part is over for the most part.
- Now you need to ensure your spare NIC meant for mirror traffic is plugged into with an ethernet cable to your switch port that is mirroring the desired traffic.
- Pull up the Security Onion Official documentation/installation guide found here. https://docs.securityonion.net/en/2.3/configuration.html#production-server-standalone
- Start the VM
- Select install Security Onion 2.3.X or Test this media then install Security Onion 2.3.X
- Follow the Quick install Wizard.
- Ensure you select “Production Server-Standalone, if you want full functionality.

Final Gotcha's
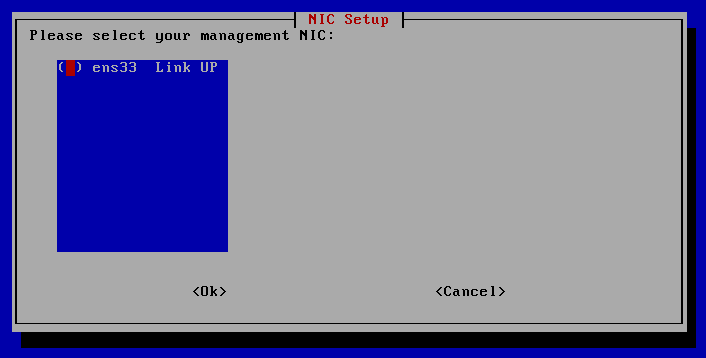
- Ensure you select the correct NIC for your management NIC. This picture shows an single NIC install. You should have two. Usually Eth0 is the correct NIC.
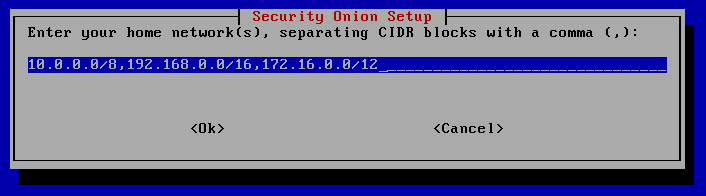
- The “home network(s) are the networks you wish to monitor. If you have VLANS, you will have more then one. Make sure you put all desired networks in this field or you will not monitor traffic from the missing network.
Whats Next?
- Follow the configuration guide to wrap up the installation.
- Use your favorite browser to navigate to either Https://YourSecOnionIpAddress OR Https://FQDNofYourSecOnion
- Use the official documentation to configure and install “agents” such as Wazuh, Osquery, or WinLogBeat in conjunction with sysmon to shuttle logs from your hosts to the Security Onion.
- Stay tuned for my config guide outlining those steps!